
Is your garage a cluttered mess of tools, seasonal décor, and forgotten items? You’re not alone. For many people, the garage becomes a dumping ground for anything that doesn’t have a place inside the house. The good news? With a little planning and determination, it’s entirely possible to organize your garage in a day.
This guide will walk you through a realistic, step-by-step process to turn your garage chaos into a clean, functional space all in just one day.
Step 1: Set a Clear Goal and Gather Supplies
Before you lift a single box, define what you want from your garage. Do you want it to store cars, serve as a home gym, be a workshop, or just hold seasonal gear? Knowing your goal will help guide every decision you make throughout the day.
Gather supplies ahead of time:
-
Trash bags (heavy-duty)
-
Storage bins (clear if possible)
-
Labels and a marker
-
Shelving units or pegboards (if needed)
-
Cleaning tools (broom, mop, dustpan, rags)
-
A folding table or tarp to sort items on
Having everything ready will prevent unnecessary trips mid-project and keep your momentum going.
Step 2: Empty the Garage Completely
Yes, everything. Pull every item out of your garage and lay it out on the driveway, lawn, or in a designated sorting area. This is a critical step in garage organization because it gives you a clean slate and forces you to evaluate each item individually.
As you unload, start mentally sorting items by category tools, sports gear, holiday decorations, gardening supplies, etc. Grouping like with like will make the next step much easier.
Step 3: Sort Items into Categories
Now that everything is out in the open, it’s time to make decisions. This is where real garage decluttering happens.
Create these four piles:
-
Keep: Items you use regularly or seasonally
-
Donate: Usable items you no longer need
-
Sell: Things that have value but you don’t want to keep
-
Trash: Broken, outdated, or unusable items
Ask yourself: “Have I used this in the last year?” If the answer is no, it probably doesn’t need to go back into your garage.
Step 4: Clean the Garage Before Anything Goes Back In
While the garage is empty, take advantage of the opportunity to give it a good clean. Sweep the floor, dust off any built-in shelves, and wipe down cobwebs from the corners. If you have time, consider a quick floor touch-up or even laying down rubber mats for a fresh, polished look.
A clean space is more motivating and makes it easier to maintain your new system.
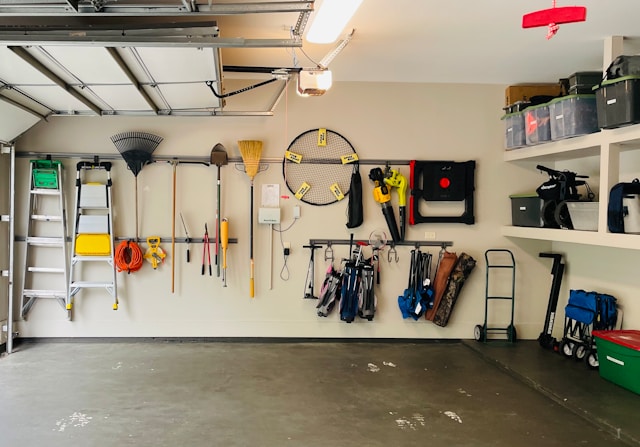
Step 5: Create a Storage System That Works
This is where your garage makeover truly begins.
Use vertical space: Install shelves or pegboards to get items off the floor and onto the walls. Wall-mounted hooks are great for bikes, ladders, and garden tools.
Use clear storage bins: Being able to see what’s inside helps reduce clutter and confusion. Label each bin clearly based on its contents.
Create zones: Assign specific areas of your garage to specific types of items. For example:
-
Front right corner: everyday tools
-
Back wall: seasonal decorations
-
Near the door: recycling or household overflow
-
Overhead racks: rarely-used items like camping gear
By organizing by function, you’ll always know where to find things.
Step 6: Load Items Back in an Organized Way
Now it’s time to bring items back into the garage but only the ones you decided to keep. Start by placing less frequently used items in harder-to-reach spots, like upper shelves or ceiling racks. Keep daily or weekly use items easily accessible, especially if you’re still using the garage for parking.
As you put each item away, label everything you can. Even shelves and wall sections can benefit from labeling to keep everyone in your household on the same page.
Step 7: Dispose of or Donate Unwanted Items
Don’t let your “donate” or “sell” pile sit around for weeks.
For donations:
-
Schedule a pickup with a local charity like Goodwill or Habitat for Humanity
-
Drop items off at a donation center on your way out
For trash:
-
Check if your city offers bulk pickup
-
Rent a small dumpster for heavy or large debris
For sales:
-
Consider holding a garage sale next weekend
-
Post items on local marketplaces like Facebook Marketplace or OfferUp
Getting these items off your property is the final step in the one-day garage organization process.
Bonus Tips for Maintaining Garage Organization
You’ve put in the work ow keep it that way. Here are some simple garage organization tips to help maintain your space long-term:
-
Set a reminder to do a quick 15-minute tidy-up once a month
-
Keep a donation bin in the garage year-round and empty it regularly
-
Enforce the “one in, one out” rule to prevent clutter build-up
-
Use wall hooks and labeled bins so that everything has a home
Organization isn’t a one-time event it’s a habit. But when the system is simple and logical, it’s easier to stick with it.
Conclusion
You don’t need a full weekend or a professional organizer to reclaim your garage. With the right plan and mindset, you can organize your garage in a day and enjoy the satisfaction of a clean, functional space.
From decluttering to zoning, using vertical storage to labeling bins, this one-day garage makeover approach will help you transform chaos into order. All it takes is commitment, a bit of elbow grease, and a willingness to let go of what you no longer need.
So roll up your sleeves, open the garage door, and get started you’ll be amazed by what you can accomplish in just one day.